A while back, I put together a tea set for one of my nieces for her birthday. I was inspired by this set from Pottery Barn:
Cute, right? And totally doable.... or so I thought! The little tea sandwiches were pretty easy to figure out, but the cupcakes were a different story... my first version turned out a little crazy and lopsided and not at all like I wanted. But, after I thought about it for a while, I came up with the version below, which I actually really liked.
I ended up making the tea sandwiches, some cupcakes, and some napkins. I bought the plates, cups, and little pitcher at a thrift store. Oh, and I also found an adorable little metal bucket covered in cupcakes to put the whole set in. I think my version came out pretty cute... I kind of wanted to keep it! ;)
This is my first time to try to write a tutorial for anything (which is why I said I was dreading writing this post), so please be patient with me. If you have any questions, or any suggestions for the next time I make these, please feel free to comment and let me know!
The finished product:
The tea sandwiches:
1. Cut out two triangle and three rectangles per sandwich
I used paper templates for the triangles and then measured the
sides of the triangles to determine how long my rectangles should
be... that's a lot of math for this non-math girl! ;)
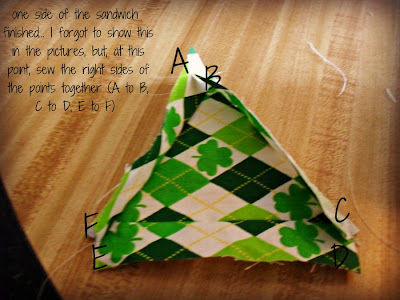
2. Sew the rectangles to the three sides of the triangle, right sides together
Now you have one side of the sandwich finished! I forgot to show
this in any pictures, but at this point, sew the right sides of the
points together (A to B, C to D, E to F)
3. Attach the other triangle to the sandwich- right sides together
4. When you've finished sewing all sides of the sandwich together,
turn right side out and stuff. Little confession: instead of
leaving part of the seam undone like I would usually do,
I just cut a slit in one of the triangles to put the stuffing in.
Don't worry! It will be covered up later!
leaving part of the seam undone like I would usually do,
I just cut a slit in one of the triangles to put the stuffing in.
Don't worry! It will be covered up later!
The "filling" is now finished... just waiting for some bread!
For the "crust," I cut a triangle a little larger than the "filling" out
of felt with pinking shears.
5. Handstitch the felt "bread" to the "filling."
I used regular thread, doubled up, but I ended up going back
over the stitches to make them a little more substantial.
You could use embroidery floss as well, and probably just do one set of stitches.
The cupcakes:
I cut out 3 circles- one large, one medium, and one small. I wish
I had more exact measurements for you, but I just used a small
plate for the large circle, a teacup for the medium one, and a
jar for the small circle.
2. Sew the smallest circle to the middle (roughly) of the largest circle
3. Sew a gathering stitch around the outside of the largest circle
4. Design and sew the top of the cupcake using the medium
circle as the base. Get creative- you can make whatever design you want!
5. Gather the top of the large circle (cupcake bottom).
I played around with having the small circle on both the outside
and the inside of the bottom. It's really just there for stability,
so it doesn't matter which way you do it, and it looks
cute either way.
6. This is where it gets a little tricky, and I'm sorry I don't have
better pictures! Pin the top of the cupcake to the
gathered bottom, scrunching (so technical, I know!) it together
so that the bottom matches up with the top. Don't forget
to leave an opening for the stuffing.
7. Sew the top and bottom together. The only way I could
figure out to do this was just to sew around the edges.
The seam shows, but I wanted the ruffly edge of the bottom
piece to show at the top.
8. Stuff it and sew the opening closed. Tada! A cupcake!!
I really love how this set turned out! And I think my niece really liked it, too:
I hope this little tutorial made at least a little sense! If you end up making these yourself, I'd love to see what you come up with!!

.JPG)


Awww, your niece is adorable. ;) and she loves her tea set. You did an A-mazing job! Gracias, Tia Jessica!
ReplyDelete