So, as you know, yesterday was my birthday! It was awesome- super awesome, in fact! :) If you somehow missed my post yesterday about the awesome gift my awesome husband got me, check it out here.
One of the highlights of any celebration is obviously food, and in particular, dessert! This year, I decided I was going to make my own decadent chocolate cake... and it would somehow involve salted caramel (one of my obsessions!). So, I searched Pinterest for recipes and found this recipe for a Salted Caramel Ding Dong Cake over at Portuguese Girl Cooks. I didn't want the vanilla cream, so I just made the chocolate cake and the caramel ganache. I think I overcooked the cake because it was a little dry, but it's still very chocolatey... and very delicious! In place of the vanilla cream, I used that wonderful wonderful Philly Cheesecake Spread you can buy in a tub- oh my word! So good! I also wanted some caramel just by itself, so I used this recipe from Say Yes To Hoboken.
I did have some mishaps putting it together... the first batch of caramel from the Ding Dong cake recipe burned a little... and so did the second batch... grrrr! But, once I added it to the chocolate, you couldn't really tell. Also, I wanted to cool down and firm up the caramel sauce really quickly, so I popped it in the freezer for a few minutes. When I went to take it out, it was not as firm as I thought, and as I swung it towards me, I dumped half of the bowl all over myself... and the floor... and the wall... Our dog thought it must be HER birthday and tried to lick it all up before I could clean it up... oh brother!
I did finally get everything finished and the cake put together... and eaten! Well, just some of it, I'm not THAT much of a pig! ;) Anyway, here's how it turned out:
Not bad, not bad at all! I will admit, it does look a little bit like someone sat on it, but it's delicious!! ;)
P.S. I just had a piece right now for research purposes to see if it was still good today... it is! :)
Thursday, December 6, 2012
Wednesday, December 5, 2012
Happy Birthday to me! {Reading Kit Gift Idea}
Yay! It's my birthday today! Happy birthday to me!! ;) As I've gotten older, I've tried to become "more adult" about my birthday and not get excited, but I can't help it! And I don't really even mind that I'm getting older- it's not like I can prevent it, so I might as well celebrate it, right?
I wanted to share what Nathanael got me for my birthday- not only because I want to brag on him because he's so awesome (he is!), but also because it's a really, really great idea. Seriously, I thought maybe he had been peeking at my boards on Pinterest. But nope, he came up with this all by himself! And I love it!!
I love to read, and a few years ago Nathanael bought me a Kindle for Christmas. This year for my birthday, he put together a "reading kit" for me in three separate packages.
The first package said it was to make me more comfortable while I read:
The second one included things to snack on and drink while I'm reading:
And the third package had some items to grow my library:
I know that's not a great picture, but that's a gift card for Amazon to buy more books for my Kindle.
Here is my whole "reading kit" together:
I have to say, I'm very impressed! And a little jealous that I didn't think of this myself. This is seriously a great gift for people who like to read! I'm so blessed to have a husband who knows me so well and who is so thoughtful!
On a side note, I'm working on getting more posts ready to share some things that I've done and made for Christmas... we'll see if they'll actually get done or not... ;)
I hope everybody is having a great December so far- try not to stress out too much & be sure to take time to make memories!
I wanted to share what Nathanael got me for my birthday- not only because I want to brag on him because he's so awesome (he is!), but also because it's a really, really great idea. Seriously, I thought maybe he had been peeking at my boards on Pinterest. But nope, he came up with this all by himself! And I love it!!
I love to read, and a few years ago Nathanael bought me a Kindle for Christmas. This year for my birthday, he put together a "reading kit" for me in three separate packages.
The first package said it was to make me more comfortable while I read:
And the third package had some items to grow my library:
I know that's not a great picture, but that's a gift card for Amazon to buy more books for my Kindle.
Here is my whole "reading kit" together:
I have to say, I'm very impressed! And a little jealous that I didn't think of this myself. This is seriously a great gift for people who like to read! I'm so blessed to have a husband who knows me so well and who is so thoughtful!
On a side note, I'm working on getting more posts ready to share some things that I've done and made for Christmas... we'll see if they'll actually get done or not... ;)
I hope everybody is having a great December so far- try not to stress out too much & be sure to take time to make memories!
Thursday, October 18, 2012
Assemble!!
About a month ago, a movie that Nathanael and I had been looking forward to for a VERY long time FINALLY came to DVD/ Bluray- The Avengers!!! Yay!! We had watched all of the movies leading up to this one (I even did a Captain America themed movie night that I didn't take pictures of... *tears*), and had been anxiously anticipating the day that we'd be able to see The Avengers. If you think that's a little dramatic, you don't know us very well! ;) For an occasion so momentous, we could not, of course, just sit down and watch the movie... we had to have a whole evening planned around and devoted to viewing this cinematic masterpiece. ;)
Let me just tell you up front that I did spend quite a bit of time planning this, but on the day of the actually "party," my husband came home early from work (which was awesome!), so I abandoned some of the things I had planned on doing as far as decorations, etc. go. Other things got done a little more sloppily than I would have liked. But, in the end I think it turned out great and it was tons of fun!
For dinner, I tried to come up with dishes that I could tie in to the characters from the Avengers. Here's what I came up with:
I made these using this recipe from Kirbie Cravings. I just added some chopped up jalapenos to the batter to give them a little extra kick. I've made these several times now and have always been really happy with how they turn out- yummy!
Just regular sweet tea, but with a fancy Avengers name...
Let me just tell you up front that I did spend quite a bit of time planning this, but on the day of the actually "party," my husband came home early from work (which was awesome!), so I abandoned some of the things I had planned on doing as far as decorations, etc. go. Other things got done a little more sloppily than I would have liked. But, in the end I think it turned out great and it was tons of fun!
For dinner, I tried to come up with dishes that I could tie in to the characters from the Avengers. Here's what I came up with:
Pepper's Popper Popovers
Thor's Thunder Tea
Captain America's Star Spangled Sliders
These were BBQ chicken on little mini buns I made using this recipe. This is the same recipe I used for the mini hot dog buns for our football party.
Hulk SMASH'ed Potato Balls
I made these using this recipe from Forkful of Comfort. I added a little bit of broccoli into the balls- both for some green color, and also to try to make it a little healthier. I didn't love these like I thought I would, but I don't think it's the recipe's fault. I was in a hurry when I was making these, and I don't think I took enough time rolling them in the bread crumbs. When I tried to fry them, the bread crumbs all came off. They still tasted pretty good, though, just not crunchy like I imagined them.
Stark's Saucy Sundaes
These were just frozen yogurt with brownies and strawberry sauce... not hard or complicated, but still pretty yummy! :)
As far as decorations go, I just hung up some streamers in red, white, and blue. I also made some tissue paper poofs (very quickly, so they were sloppy), and little signs for the food telling what each dish was. The signs were much cooler on my computer, but our printer was running out of ink, so I ended up having to go over the letter with marker. Not cool, man, not cool. I also hung up an Avengers poster, but I didn't post pictures of that because, well, it's just a poster...
Nathanael and I made sure to dress to go with the theme, as well. Nathanael has a Marvel tee that we found at a Goodwill in Indiana for $2 this last summer. The tee has most of the Avengers on it, so he just wore that. I didn't have anything, and didn't want to pay for a tee from Walmart, so I made my own- I cut the pieces for the Black Widow symbol out of felt, sewed them together, and sewed it onto an old tshirt I had. I think it turned out pretty cute!
The movie was really, really, really good! We loved it! We also had a really great time with the whole date part of the night. It's always a lot of fun for me to plan these things and come up with ideas on how to make them special! I'm so thankful I have a husband who enjoys my craziness! ;)
Tuesday, October 2, 2012
Football Party
As you may or may not know, we are big Chicago Bears fans in this house. I mean BIG! Nathanael and I both love watching football, but because we just get the local channels on our TV, we don't always get to see all of the games. Fortunately, we have kind friends (Mike and Jenn Walker) who take pity on us and invite us over to their house to watch games with them.
Last night's game was a match-up between the Bears (our team!) and the Cowboys (Mike's team). I was a little nervous about if we'd still be friends after the game (kidding!), but everything turned out fine. ;) Especially since the Bearswiped the field with the Cowboys won. AND, we had some delicious food!! Jenn and I came up with the idea to make foods representing the respective teams (Chicago and Dallas), and everything turned out delicious!
I've included pictures and recipes for each "side":
CHICAGO:
For the Chicago food, I made mini Chicago dogs, mini deep dish pizzas, and Bears cupcakes:
For the mini dogs, I just used Lil' Smokies, and made the buns using this recipe. I found the idea through Pinterest on Oh Happy Day. The recipe calls for white flour, but I did add some wheat flour, just to make it a tiny bit healthier. I suppose these aren't real Chicago dogs because they don't have poppy seeds or all the condiments necessary for a true Chicago dog, but I thought they were cute- and yummy!
These are just regular cupcakes with little orange and blue flags on top... and Teddy Grahams :)
We had a great time & I'm so thankful the Walkers invited us over... and stayed friends with us after our team beat Mike's... not to rub it in or anything... ;)
Last night's game was a match-up between the Bears (our team!) and the Cowboys (Mike's team). I was a little nervous about if we'd still be friends after the game (kidding!), but everything turned out fine. ;) Especially since the Bears
I've included pictures and recipes for each "side":
CHICAGO:
For the Chicago food, I made mini Chicago dogs, mini deep dish pizzas, and Bears cupcakes:
For the mini dogs, I just used Lil' Smokies, and made the buns using this recipe. I found the idea through Pinterest on Oh Happy Day. The recipe calls for white flour, but I did add some wheat flour, just to make it a tiny bit healthier. I suppose these aren't real Chicago dogs because they don't have poppy seeds or all the condiments necessary for a true Chicago dog, but I thought they were cute- and yummy!
These are just regular cupcakes with little orange and blue flags on top... and Teddy Grahams :)
I'm pretty proud of my mini deep dish pizzas! I'm sure other people have done this before, but I actually came up with this myself! Yay me! ;) I used Grand Jr. biscuits, pressed them into muffin pans, put a chunk of mozzarella in the bottom (how's that for accurately measures quantities?), dropped a spoonful of pizza sauce on top, sprinkled some parmesan cheese on top and popped them into a 425 degree oven for about 15 minutes. They turned out pretty delicious, if I do say so myself! ;)
DALLAS:
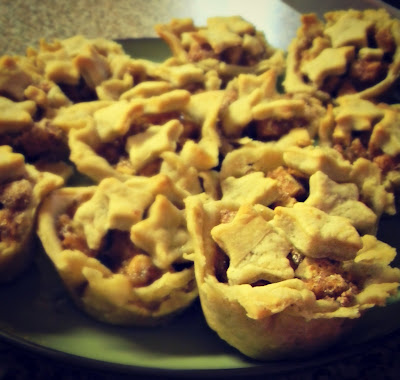
Since Dallas is supposedly "America's team" (whatever!), Jenn made all- American comfort style food- mini pot pies and little apple pies with ice cream. I'm not usually a huge fan of pot pies, but these were delicious!! The crust was just the right thickness and the filling was really chicken-y (that's a real word, ok?). Good stuff!
I'll have to get Jenn's recipes from her- she used the same recipe to make the crust for both pies. Note: after checking her Pinterest board, I think maybe she used this recipe, but I'll doublecheck with her! :)
Oh, I HAVE to include this picture of my handsome husband... and our adorable puppy in her Bears scarf.... and Wyatt Walker in the background.... ;)
Thursday, September 13, 2012
Shhhhhh! Quiet Book
Phew! It's finally done! For the past week or so, I've been working non-stop (literally- I even took some stuff with me to a doctor's appointment to work on while I waited) on a quiet book for one of my nephews for his birthday. I love how it turned out!! I wanted to do Bible stories, and I got a most of my ideas and patterns from this blog. She had a ton of great tips for working with felt, and graciously shared her patterns. It was a HUGE help since I'm not a great artist and my poor little people would have ended up looking like characters from a horror film- I'm not exaggerating!
Here's what I came up with (and yes, I know that the pictures go outside the margin lines, but I wanted them to be big enough to see, so please bear with me!):
The front cover:
Page 1: Creation The top picture shows the completed page put together, and the bottom pic shows all of the different pieces. As you can see, the flower unbuttons, the clouds snap off, and the fish unvelcro (real word?). The water at the bottom is a pocket to keep all the pieces in.
Page 2: Noah's Ark This page took a loooong time because of all the little animals, but I love it! The animals are SO cute! This was one of the pages that I pretty much just copied straight from Laura's patterns. Cute, right?
Page 3: Joseph's coat of many colors The stripes on his coat snap off, unvelcro (I'm just going with it as a real word), and unhook. The little hill he's standing on doubles as a place to keep his stripes. This was my own original design, but I did use Laura's pattern for her little men to make Joseph.
Page 4: David and Goliath This is another page I created using Laura's patterns (seriously, what would I have done without them?). I love Goliath's bared teeth- so funny! I added a little piece of the hook side of velcro to the back of the stone so that it would stick to Goliath's head. Also, I used elastic thread on the stone so it could "sling" better.
Page 5: Jonah and the whale Yet another page where I used Laura's patterns. I had to alter it a little because my pages were smaller than hers, and I didn't take that into account until AFTER I made Jonah (brilliant, I know), but I think it still turned out pretty cute! The see- through plastic is a little sandwich baggie.
Page 6: Jesus feeds the 5000 I made the last couple of pages a little less complicated... I was getting tired! ;) I love the little basket weave on the basket for the fishes and loaves.
Page 7: The Resurrection I used the same pattern for the little men I'd been using to make the angel for inside the tomb.
Page 8: Our home in Heaven Last page!! Yay!! The windows and doors have the hook side of velcro on them to stick to the house and the roof opens so that the pieces can be stored inside.
I put the whole thing together with album rings- I even made buttonholes to put the rings through, which was a whole new experience for me! I really love how the whole book turned out, and if I hadn't already put my nephew's name on the front, I would be really tempted to keep it myself and take it to church with me- I'm kidding, but I do seriously love it! I'm seriously considering making different versions of these for all of my nieces and nephews... AFTER I recover from this one...
If you have any questions about how I did any of this, feel free to ask and I'll TRY to answer! ;)
Monday, July 9, 2012
Tea for Two
I know it's been about a month since I last posted.... aargh! I've been trying to get this post together for a while, but I was kind of dreading it a little. I knew it was going to be complicated and tax my brain... ;)
A while back, I put together a tea set for one of my nieces for her birthday. I was inspired by this set from Pottery Barn:
Cute, right? And totally doable.... or so I thought! The little tea sandwiches were pretty easy to figure out, but the cupcakes were a different story... my first version turned out a little crazy and lopsided and not at all like I wanted. But, after I thought about it for a while, I came up with the version below, which I actually really liked.
I ended up making the tea sandwiches, some cupcakes, and some napkins. I bought the plates, cups, and little pitcher at a thrift store. Oh, and I also found an adorable little metal bucket covered in cupcakes to put the whole set in. I think my version came out pretty cute... I kind of wanted to keep it! ;)
This is my first time to try to write a tutorial for anything (which is why I said I was dreading writing this post), so please be patient with me. If you have any questions, or any suggestions for the next time I make these, please feel free to comment and let me know!
I hope this little tutorial made at least a little sense! If you end up making these yourself, I'd love to see what you come up with!!
A while back, I put together a tea set for one of my nieces for her birthday. I was inspired by this set from Pottery Barn:
Cute, right? And totally doable.... or so I thought! The little tea sandwiches were pretty easy to figure out, but the cupcakes were a different story... my first version turned out a little crazy and lopsided and not at all like I wanted. But, after I thought about it for a while, I came up with the version below, which I actually really liked.
I ended up making the tea sandwiches, some cupcakes, and some napkins. I bought the plates, cups, and little pitcher at a thrift store. Oh, and I also found an adorable little metal bucket covered in cupcakes to put the whole set in. I think my version came out pretty cute... I kind of wanted to keep it! ;)
This is my first time to try to write a tutorial for anything (which is why I said I was dreading writing this post), so please be patient with me. If you have any questions, or any suggestions for the next time I make these, please feel free to comment and let me know!
The finished product:
The tea sandwiches:
1. Cut out two triangle and three rectangles per sandwich
I used paper templates for the triangles and then measured the
sides of the triangles to determine how long my rectangles should
be... that's a lot of math for this non-math girl! ;)
2. Sew the rectangles to the three sides of the triangle, right sides together
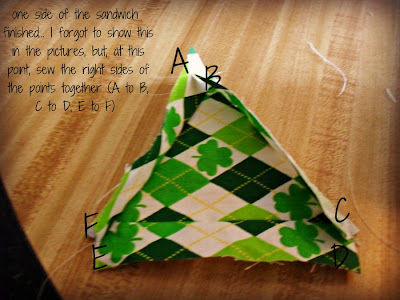
Now you have one side of the sandwich finished! I forgot to show
this in any pictures, but at this point, sew the right sides of the
points together (A to B, C to D, E to F)
3. Attach the other triangle to the sandwich- right sides together
4. When you've finished sewing all sides of the sandwich together,
turn right side out and stuff. Little confession: instead of
leaving part of the seam undone like I would usually do,
I just cut a slit in one of the triangles to put the stuffing in.
Don't worry! It will be covered up later!
leaving part of the seam undone like I would usually do,
I just cut a slit in one of the triangles to put the stuffing in.
Don't worry! It will be covered up later!
The "filling" is now finished... just waiting for some bread!
For the "crust," I cut a triangle a little larger than the "filling" out
of felt with pinking shears.
5. Handstitch the felt "bread" to the "filling."
I used regular thread, doubled up, but I ended up going back
over the stitches to make them a little more substantial.
You could use embroidery floss as well, and probably just do one set of stitches.
The cupcakes:
I cut out 3 circles- one large, one medium, and one small. I wish
I had more exact measurements for you, but I just used a small
plate for the large circle, a teacup for the medium one, and a
jar for the small circle.
2. Sew the smallest circle to the middle (roughly) of the largest circle
3. Sew a gathering stitch around the outside of the largest circle
4. Design and sew the top of the cupcake using the medium
circle as the base. Get creative- you can make whatever design you want!
5. Gather the top of the large circle (cupcake bottom).
I played around with having the small circle on both the outside
and the inside of the bottom. It's really just there for stability,
so it doesn't matter which way you do it, and it looks
cute either way.
6. This is where it gets a little tricky, and I'm sorry I don't have
better pictures! Pin the top of the cupcake to the
gathered bottom, scrunching (so technical, I know!) it together
so that the bottom matches up with the top. Don't forget
to leave an opening for the stuffing.
7. Sew the top and bottom together. The only way I could
figure out to do this was just to sew around the edges.
The seam shows, but I wanted the ruffly edge of the bottom
piece to show at the top.
8. Stuff it and sew the opening closed. Tada! A cupcake!!
I really love how this set turned out! And I think my niece really liked it, too:
I hope this little tutorial made at least a little sense! If you end up making these yourself, I'd love to see what you come up with!!
Subscribe to:
Posts (Atom)